Doodle drawing by finger with many brushes. Play back drawing like a movie with "MOVIE" mode, way to share your fun with others.
Join the Flickr: http://www.flickr.com/groups/paintjoy
* more than 15 brushes * movie mode to play back drawing * paint on ur photo * intuitive to choose color and set brush size * share via facebook, gmail, etc
For ads-free version, please purchase PaintJoy Pro.
----- Kids Doodle ----
If youre looking for a doodle app for your pretty young kids, you may try "Kids Doodle", whose brush and color are randomly changed to present a colorful effect. Its usage is also tailored specifically for kids easy-to-use.
"Kids Doodle" supports below features: * Supports several brushes, such as neon, rainbow, emboss, crayon. * "Movie" mode to play back the doodle like a movie * "Save" painting to SD card. * "Share" kids doodle via message, facebook, gmail, pisca, etc. * Shake phone to start a new doodle.
------ Sketch Paint -------
Freely sketch with this "Sketch Paint", and enjoy your masterpiece like movie playing back the sketch steps.
Features: ☆ About ten brushes. More brushes will be avaiable in new version. ☆ Eraser ☆ Undo / Redo ☆ Pinch to Zoom In or Zoom Out ☆ Brush Pressure 0% - 100% ☆ Desktop-class color picker ☆ Save to SD ☆ Share by e-mail, flickr, MMS, etc.
Seven tips and tricks for your Nexus 7! Even if you’re a long-time Android user, you most likely stumble over some long “hidden” features that you didn’t know existed from time to time. Just having a look into the settings or playing around with your device will present some kind of new thing that you didn’t know was there before. I continually finding myself browsing through various aspects of my Nexus 7, particularly after the update to Android 4.4, just to see what has changed and what I haven’t noticed before. As such, we’ve included some pretty well known tips and well as a few other hidden gems that most users might not even know about even after using their device for some time.
Do you have apps in which you constantly receive notifications from, but you really don’t want to see them anymore? If you head to the Apps portion of settings, you can select the offending app from the list of installed apps and then just uncheck the Show Notifications option just at the top of the opened page. That’s all it takes to remove the ability for that app to continue sending you notifications.
One of the great benefits of using an open operating system like Android is the ability to customize it the way you want. You can change the default font to your favorite one, use a third party launcher and even install a new skin on your device without much trouble. Android also allows you to select the application that should complete an action for you. Indeed, if there are several applications that can, let’s say, play music files, Android will ask you which one you would rather use, be it for this time or all future files. In this post, we will show you how to select these applications and how to undo this selection to reset your default apps.
Like Us On Facebook Picking Your Default Apps If you have more than just one application on your device that supports a specific file type, you will be prompted to select which one you would like to use to open your file. This choice can be set to be permanent, in which case your device won’t ask you about it anymore, or a one-time selection. The latter simply means you’ll be asked the same question next time you open the same file type.
When several apps can open a file, Android will ask you which one you’d like to use
Let’s take a concrete example: On my Galaxy Note II, Google’s Play Music, Samsung’s Touchwiz Music and ES Music Player can play music files. When I open an audio file, my phone lets me select which application I would rather use to play the file. I have personally chosen not to set a default application, because I manually open the music player when I want to listen to my music, and not the file directly. Nevertheless, I particularly dislike Samsung’s default Gallery application, which I have replaced with QuickPic. In order to do so, I had to set QuickPic as my default application for photos. Thankfully, the process is particularly easy, as you simply have to select Always after you select the app to open your file, and your device will remember your choice and won’t ask you again. Similarly, I’ve selected Google Chrome to be my default browser instead of Samsung’s and I also had to tell Android to open all web pages with Chrome. For browsers, you may be prompted several times, as Android will recognize protocols — https:// etc — in addition to file types, which is why you may have to confirm your selection more than just once.
Resetting Your Selection
What happens if you try a new app and end up liking it more than your current browser? You would need to reset the default application before setting the new one as your default browser. The process is fairly simple, but somehow different from the approach you may be used to on your computer. Indeed, while most people are used to having a specific file type being associated to an application, Android associates an application with a file type. In simpler terms, this means that if you want to reset your default browser, you would need to reset the application settings for your current browser. Here’s how to do it:
Go to your Android Settings
Select Applications
Select the application that is currently set to open a file type — for example, Google Chrome
Scroll down to Launch by default and tap Clear defaults
You’re all set. Next time you open a web page or an HTML file, you’ll be asked to select your preferred browser.
Be careful, if your app is associated with several file types, they will all be reset. This holds particularly true for media players, as they can play audio and video files.
You can reset the Launch by default settings in the Application Manager
Wrapping Up
Thanks to Android, it’s easy to use several apps and select which one to use when opening a file. This allows for more flexibility, as some applications are more complete but take longer to load. Of course, if you’d like to stick to a single application, you can easily set your device to open a specific file type using that app. In both cases, you can truly customize your system and environment according to your preference and needs.
In order to use all these Android Secret Codes you just need to simply open the Dialer of your smartphone and type the secret code of which ever function you need to perform out of all these and you are good to go.
Here Is the list of 20 Android Secret Codes for your Smartphone :-
Phone Information, Usage and Battery – *#*#4636#*#*
IMEI Number – *#06#
Enter Service Menu On Newer Phones – *#0*#
Detailed Camera Information – *#*#34971539#*#*
Backup All Media Files – *#*#273282*255*663282*#*#*
Wireless LAN Test – *#*#232339#*#*
Enable Test Mode for Service – *#*#197328640#*#*
Back-light Test – *#*#0842#*#*
Test the Touchscreen – *#*#2664#*#*
Vibration Test – *#*#0842#*#*
FTA Software Version – *#*#1111#*#*
Complete Software and Hardware Info – *#12580*369#
Diagnostic Configuration – *#9090#
USB Logging Control – *#872564#
System Dump Mode – *#9900#
HSDPA/HSUPA Control Menu – *#301279#
View Phone Lock Status – *#7465625#
Reset the Data Partition to Factory State – *#*#7780#*#*
Format Your Device To Factory State(will delete everything on your phone) – *2767*3855#
Hidden Service Menu For Motorola Droid – ##7764726
So these were 20 Android Secret Codes for your Smartphone use them and enjoy playing around with your smartphone, do tell us which one you liked the most below in the comment section and keep stalking for more tweaks for your smartphone.
IMEI writing tool for your android device. if you are facing problem “no IMEI” number after flashing your mobile it means your IMEI files are gone corrupt. it is necessary to make backup of your all data and system before flashing. so if face any problem in future then you can revert back with backup that you created earlier. but what to do now if you haven’t make backup before flashing your mobile. so you can use IMEI writing tool to write your original IMEI on you android mobile. Download from here
To confirm your subscription to 'Id-apk.com', please click on the following link:
https://blogtrottr.com/confirm/cjtHrr
As we have no control over the content of the feeds we send, consider adding busybee@blogtrottr.com to your address book or spam whitelist to placate any overexcitable spam filters.
If you weren't expecting to receive this email, then simply ignore it and we'll go away.
Hai friends, here is a wide collection of secret codes for your mobile with Android OS. These codes enables you to access the hidden options which are not shown by default on your device, and can be used for testing the functions of various utilities used by your mobile.
Note:We Cannot guaranty that these codes will work on all Android mobiles!
Previous Articles:
Nokia Universal Secret Codes.
LG Mobile Phone Secret Codes.
These codes are used only by technicians, So be careful with them and use it at your own risk. Press "Ctrl+D" for Future Use! :)
General Codes:
*#06# – To Displays IMEI number.
*2767*3855# – To format your device i.e To delete everything on the phone memory (Can be customized).
*#*#4636#*#* – This code will display your usage statistics and battery.
*#*#273282*255*663282*#*#* – This code helps you to back up all media files on your mobile.
*#*#197328640#*#* – This code will send you to the test mode, to test various functionality of your mobile.
*#*#1111#*#* – This code will display FTA software version.
*#*#1234#*#* – This code will show PDA and firmware version.
*#*#232339#*#* – For wireless LAN tests.
*#*#0842#*#* – This code is used for Backlight/vibration test.
*#12580*369# – Displays Software and hardware info.
*#*#2664#*#* – This code is used for Testing the touchscreen.
*#9900# – System dump mode.
*#9090# – Diagnostic configuration.
*#*#34971539#*#* – Will display Detailed camera information.
*#872564# – USB logging control.
*#301279# – HSDPA/HSUPA Control Menu.
*#7465625# – This code will display phones lock status.
*#0*# – This code will enable you to enter the service menu on newer phones like Galaxy S III.
*#*#7780#*#* – Reset the /data partition to factory state.
Basic Codes:
*#*#7780#*#* - This code is used for factory restore setting.This will remove Google account setting and System and application data and settings.
*2767*3855# - This code is used for factory format, and will remove all files and settings including the internal memory storage. It will also re install the firmware.
*#*#4636#*#* - This code show information about your phone and battery.
*#*#273283*255*663282*#*#* - This code opens a File copy screen where you can backup your media files e.g. Images, Sound, Video and Voice memo.
*#*#197328640#*#* - This code can be used to enter into Service mode. You can run various tests and change settings in the service mode.
*#*#7594#*#* - This code enable your "End call / Power" button into direct power off button without asking for selecting any option(silent mode, aero plane and power-off).
*#*#8255#*#* - This code can be used to launch G Talk Service Monitor.
*#*#34971539#*#* - This code is used to get camera information. Please avoid update camera firmware option.
W-LAN, GPS and Bluetooth Test Codes:
*#*#232339#*#* OR *#*#526#*#* OR *#*#528#*#* - W-LAN test (Use “Menu” button to start various tests).
*#*#232338#*#* - Shows WiFi MAC address.
*#*#1472365#*#* - GPS test.
*#*#1575#*#* - Another GPS test.
*#*#232331#*#* - Bluetooth test.
*#*#232337#*# - Shows Bluetooth device address.
Codes to launch various Factory Tests:
*#*#0842#*#* - Device test (Vibration test and BackLight test).
*#*#0588#*#* - Proximity sensor test.
*#*#0*#*#* - LCD test.
*#*#2664#*#* - Touch screen test.
*#*#2663#*#* - Touch screen version.
*#*#0283#*#* - Packet Loopback.
*#*#0673#*#* OR *#*#0289#*#* - Melody test.
*#*#3264#*#* - RAM version.
Code for firmware version information:
*#*#1111#*#* - FTA SW Version.
*#*#2222#*#* - FTA HW Version.
*#*#44336#*#* - PDA, Phone, CSC, Build Time, Changelist number.
Android tips and tricks: Android phones arguably superior in terms of quality, for example, the display interfaces, the number of applications that are useful and entertaining. But what about the battery resistance.
Because often download the application or activate the wireless network, it could be broken because the energy capacity of batteries drained.
There are a few Android tips you can do to make your android phone battery life can be more durable:
Manage wireless networks or wireless wisely. We recommend that you do not activate the entire connectivity available on mobile phones simultaneously, for example by turning on Wi-Fi, GPS, and Bluetooth.
Reduce screen brightness level. Mobile phone screen is bright indeed make a clearer. But beyond that, the higher the level of screen brightness, the greater the power output your cell phone battery.
Use one feature alone to tell if there are new messages. If there is email, instant messages, short messages (SMS), or call into the Android phone, it does not need the phone rang too loudly and vibrate. Just use one of the two earlier features, sound or vibrate so that the battery is more efficient.
Enabling an important email only. If you have five email accounts and everything is active, you should choose which email is the most frequently used and will be activated throughout the day. The reason, more and more applications, such as email, live streaming, radio, or an active social media at the same time, the greater the battery power is needed.
Always keep a spare battery. When the battery charge, you are advised not to pull out if its capacity has not reached half. Because, if the battery has not reached 50 percent occupied and has been used again, the stored energy will be easily drained because its still small.
Description: Fast Reboot is a application to quick "reboot" your phone to free up memory, it is does not require root. Simulates a reboot by closing or restarting all core and user processes and thus frees up memory. Your phone becomes faster after using the Fast Reboot.
This Application does not actually reboot your phone, only the apps and processes, and Does not require root.
Developer Great Bytes Software
How to Download
1. Search Android Market 2. Open Android Market on Your phone 3. Go to "Search" 4. Type "Fast Reboot" in the search field and hit "Search" 5. Once you find the "Fast Reboot" app and follow the instructions
Or, you can click this link Fast Reboot, Quick Reboot Your Phone to Free up Memory.
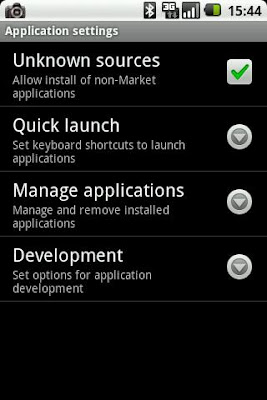
The regular procedure of Android app installation is searching on Android market, tapping "Buy" or "Install". Its easy. But what if the app you like isn’t in the Market? Fortunately, Android phone allow user to install app that isnt in the official market. So user can install non-market app. User can use desktop app for installing app to Android device using Android Injector. If you think its too complicated, actually you can install .apk file directly to your device.
How to install non-android market apps? Set your device to allow unknown source app installation. Go to Setting and tap on Unknown sources. It will allow you to install non market app.
If you have a web page that links to the .apk you can tap the link to download and install it. Remember,do this with your own risk. Sometimes, you need to restart your device for complete installation.